

Photo by Bernd 📷 Dittrich on Unsplash
Mini Guide to Package management with CMake and Vcpkg for C++ applications on Windows


Author : Victor Mak
Created Date : 11th March, 2024
Package management in high level languages like Python and Javascript is a breeze. All you have to do is to run a very simple command like: npm install some-package or pip install django, and you can get started with your development in no-time. Even in Rust, the renowned language that was widely considered to be semantically difficult, is comparatively easy to get into because how cargo (Rust's package management tool) simplify the process of package management. But what about in C/C++?
Since you are already here anyways, I would assume you have some interest in developing something with C++. Maybe, it is a part of your learning journey. Maybe, you want to develop some games. Maybe, you want to get into high performance computing for embedded devices. Whichever case it might be, I hope you enjoy the tour
Why uses CMake?
I mean, why not?
If you have learnt about the basics of C++, you might know that when you want to compile C++ applications, you need to invoke g++ command to compile your application. Oh, maybe you don't because your IDE (like Visual Studio or CLion) does it for you.
g++ -o output_file source_file.cpp
Well, that's simple enough
How about this?
g++ -o output_file source_file1.cpp source_file2.cpp dependency1.cpp dependency2.cpp
It can get complicated real quick, especially if you structure your project in a way where there is multiple modules that is dependent on...guess what...multiple other modules.
CMake simplifies this process. CMake has a configuration file called CMakeLists.txt that includes all the necessary steps to compile the program successfully without having the need for you do those tedious task and focus on creating the program.
Here's how a sample CMakeLists.txt file look like:
cmake_minimum_required(VERSION 3.10)

project(MyProject)

# Add all your source files here
set(SOURCES
    source_file1.cpp
    source_file2.cpp
    dependency1.cpp
    dependency2.cpp
)

# Add executable target
add_executable(my_executable ${SOURCES})
You can set all the sources beforehand, and you are done. Of course, you need to learn the syntax a little bit. Or even if you don't want to, you can always ask Github Copilot and Chatgpt to draft it for you.
Why uses Vcpkg?
Vcpkg allows you to download and manages your dependencies even easier. Let's just say you want to use Qt inside your CMake Application. Normally, you have to:
Go to Qt website
Download Qt
Link Qt
Develop
Vcpkg allows you to skip the process 1, 2 and 3.
Vcpkg makes my life so much easier on Windows. On Linux, you have pkg-config, hence managing packages was quite easy. You want libcamera? sudo apt install libcamera-dev and there you go! But on windows? Linking errors on the left, incompatibility issues on the right, it becomes rather painful real quick :')
You basically define a vcpkg.json file and list down a list of packages you want to install for a particular workspace. And then, have your cmake uses vcpkg.cmake file and magically all the packages you installed via vcpkg would be usable by your project. It is THAT convenient.
Here's how a vcpkg.json file look like:
{
    "name": "speed-typist",
    "version-string": "0.0.1",
    "license": "MIT",
    "dependencies": [
      "fmt",
      "catch2",
      "qt5-base"
    ]
}
You can visit their github repository and follow their guidelines to get it setup on your machine.
Step-by-Step Process
I am going to talk about how you can start using Vs code, but I believe the same concepts apply even if you use other IDEs like nano or CLion.
Install CMake
Clone Vcpkg and follow the instructions
Check environment variables to make sure
VCPKG_DEFAULT_HOST_TRIPLET,VCPKG_DEFAULT_TRIPLETandVCPKG_ROOTare set
In Vs Code, install CMake Tools and Vcpkg CMake Tools
Ctrl+Shift+Pand find Vcpkg: Enable and Vcpkg: Enable Manifest option and run them. (Make sure you have vcpkg.json setup already tho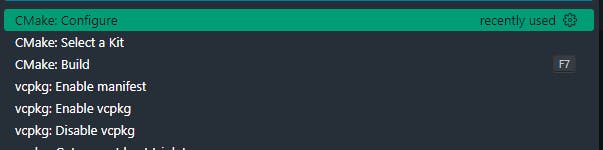
)
Run CMake:Configure and everything should be alright.
You have to make sure your CMake Tools Extension settings -> cmake.platform and "cmake.preferredGenerators" is set to x64 and "Visual Studio 17 2022" (depending on your compiler set
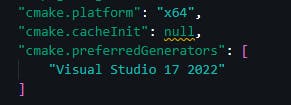
)
There you go! Your program should start its compliation process and everything should run as you expect it to run.
There could be linking errors here and there. I would be happy to help out. You can send an email to contact@htetaung.com for that! I will create video tutorials in the future after I get more time.
Author's Notes
Hello, I am Victor! A 20 year old borne in Myanmar, studying Malaysia. I have always been greatly interested by the future of tech and programming. I love to share my knowledge as my #learninpublic journey. We can always connect with each other X or Linkedin.